Color Correction with the Sony AX100 by Peter Lightowler
Underwater Color Correction – Sony AX100
by Peter Lightowler.
A look at evaluating the Sony AX100 behavior underwater and how to correct for color inaccuracies.
Water is a light filter. As divers this is intuitively obvious: we remark about blue or green water conditions, or how dive lights reveal colors that aren’t there with ambient light. As underwater imaging enthusiasts we know that the rapid loss of red dramatically affects our images, leaving us with washed out, blueish grey or green shots.
The way we deal with and correct for these changes is a challenge. But if we examine the various methods of underwater color correction we will find some easy, useful solutions.
Our focus for underwater color correction in this article is the Sony AX100 4K camcorder. It is important to note that every camera will behave differently while trying to handle color changes underwater. The AX100 is no exception. As you will see, the AX100 exhibits typical and not so typical behaviours
Color Correction Tools
Before we delve into the testing and results, let’s review the variety of Color Correction (CC) tools available to the underwater imaging enthusiast and alike. We have four basic tools: Artificial Light; Underwater Color Correction Filters; In-camera tools like White Balance; and Post Production.
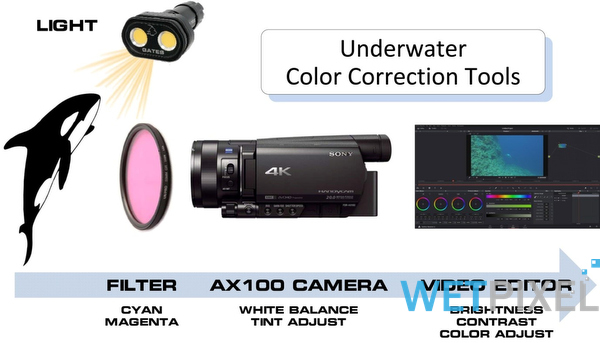
- Underwater lights. Adding artificial light underwater is a classic way to obtain good color. Since it is our goal in this article to characterize the performance of the Sony AX100 camera with ambient light, (and because lights add another dimension of complexity) we will discard the use of lights for the sake of this discussion, and address it in more detail as a separate topic for another CC article.
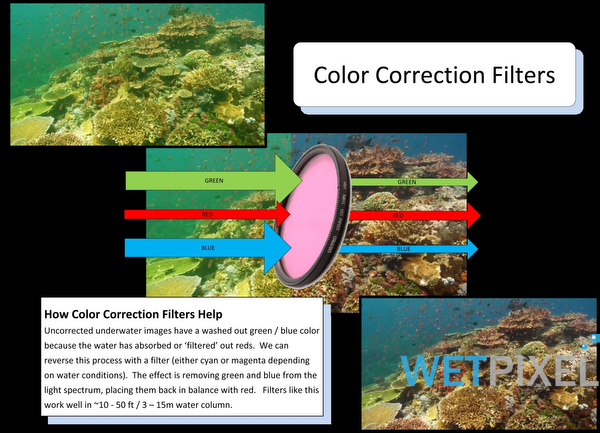
- CC Filter. A long standing method of CC, filters that are designed for underwater use, and affect specific light frequencies. In essence they act as a ‘reverse’ water filter, blocking blue / green to allow more red / yellow to pass – which is why a typical ‘blue water’ filter appears orange in color. A CC filter can be very handy as a stand-alone tool, but work in concert with in-camera tools as well.
- White Balance (WB). An in-camera tool, WB is probably the most used method of CC. Anything white in front of the lens gives the camera a solid reference point from which to adjust sensor and processor, and thus reproduce colors accurately. As you will read later, WB is not fool-proof and can introduce issues.
- Manual color adjustments. This is similar to WB but specific corrections are performed manually in-camera. In more advanced cameras you may find a ‘tint’ adjustment deeper in the menu.
- Post Production. Your video or photo editor will have extensive color correction tools. While the free version of BlackMagic’s DaVinci Resolve was used for demonstration purposes here, other editors will have similar options and layouts.

Color Correction Rules
Let’s also review the goal and rules for any color correction exercise:
- Goal. The ultimate goal is natural, pleasing images. Note, that it is not accurate images. This is a key difference. Your images should have the qualities you seek. In general this means images that are sharp, vivid, and – to use the vernacular – pop. Example: professionals typically push saturation without making an image look unnatural.
- Rule #1. Always endeavour to acquire the best color possible in-camera. While image editors can seemingly work magic, there are consequences to adjusting images in post. Noise, blue banding, and loss of sharpness can be introduced. You know: garbage in, garbage out, right? If you start with good color going into post, you have superior material to work with.
- Rule #2. CC tools are often used together. Don’t rely on one single tool to give you the best results. Your editing program can only manipulate information that has been recorded. If your WB contains very little color information, then your color correction program will only be able to push the image so far. Making major adjustments can be impossible in some cases.
- Rule #3. Test your camera. As mentioned, every camera behaves differently underwater. Further, the light filtering quality of water changes everywhere in the world. Blue water, green water and variations of both will greatly affect camera performance. You must test a camera to understand capabilities.
Why do sensors get WB wrong?
In single chip cameras, such as the CMOS sensored AX100, the pixel pattern is composed of 4 sub-pixels; 1 for red, 1 for blue, and 2 for green. This is called a Bayer pattern.
Underwater, the dominant color is either blue or green and because the Bayer Pattern has assigned more pixels to the green channel, there is not as many red pixels left to compensate for the dramatic loss of red as we dive deeper.
Humans are more susceptible to changes in green than in red or blue and you will see that significant changes are able to be made when dealing with the green channel for color correction in post-production.
We will cover this in more detail in a future article.
Testing Approach for AX100 Behavior
Let’s now turn our attention to the Sony AX100, which has some interesting specifications: UHD (4K) to SD card, 100mbps bitrate, large 1” sensor for good low light performance, Sony’s exceptionally good XAVC-s Codec, focus peaking, zebras, ND Filters, and a 12X zoom range – which is versatile and available underwater within a Gates housing. The housing also includes a standard ‘flip’ CC filter. All considered, the FDR-AX100 has become very popular amongst underwater videographers. However, there has been one issue that has plagued the AX100 and that is achieving a good white balance in camera.
Having heard reports of unsatisfactory white balance issues, a collaborative effort was put in place to address this issue and find a solution for achieving acceptable white balance results from the AX100.
The two modes commonly used for white balancing the FDR-AX100 are Auto and One Push (manual). This article will discuss both modes and how to achieve a good white balance for each.
The AX100 white balance issue manifests itself in two very distinct ways depending on which white balance mode is utilized.
- When using Auto white balance, the AX100 white balances with a green hue.
- When white balancing with the One Push Mode, it results in the camera overcompensating the red channel.
In order to understand the issues and find a solution, a number of stages of investigation were required. We needed to:
- Acquire test footage;
- Adjust color in post-production to determine what changes can be applied at acquisition;
- Apply changes. i.e. a color filter, white balance slate. Acquire footage and examine;
- Apply changes in-camera (Tint feature) that were discovered from post production.
Stage 1 – Acquire test footage
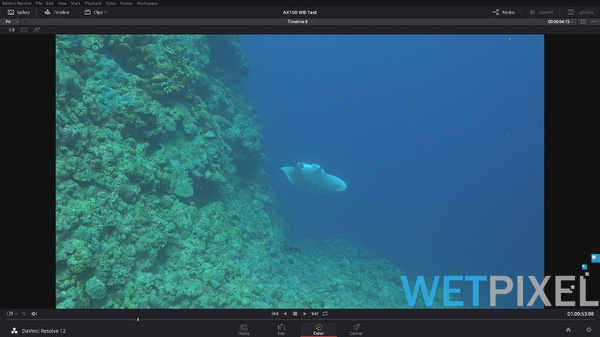
The first stage of testing for both White Balance modes occurred in the Coral Sea aboard Mike Ball’s Spoilsport, where the blue water visibility was in excess of 30 metres. In our investigations, all underwater testing was performed using a Gates Housing for the Sony FDR-AX100. The Auto White Balance Mode (WB-AUTO) with the red filter in place resulted in the AX100 white balancing with a green hue (Figure 1).
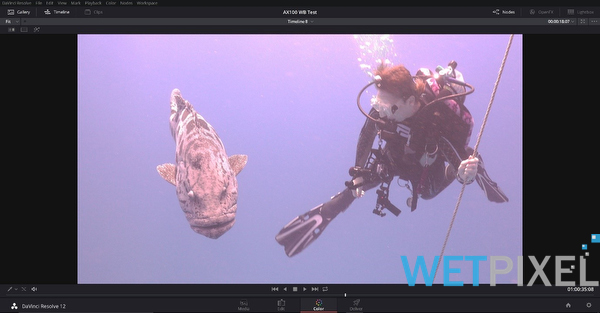
Utilising the One Push white balance mode against a white slate with the red filter in place gave rise to a different affect where the image had an ensuing red cast (Figure 2).
Stage 2 – Post-production
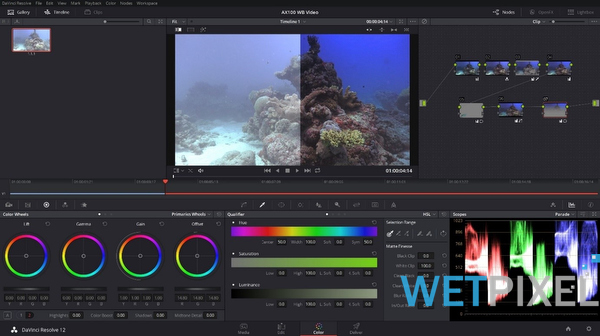
Stage two essentially involved taking the initial recordings and correcting the red and green color issues in post-production using DaVinci Resolve.
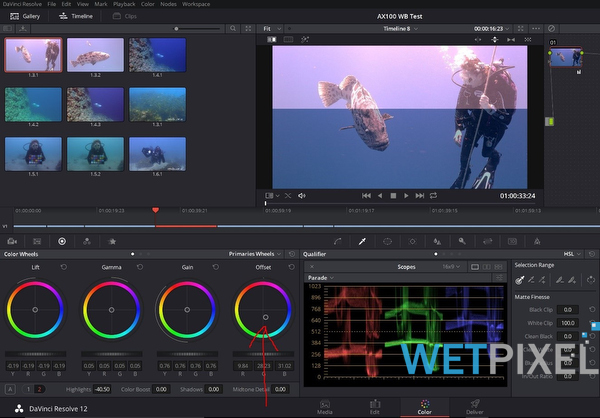
Resolve has the ability to precisely adjust shadow (which Resolve calls Lift), Midtones (Gamma), and Highlights (Gain). It also allows for a global shift of all three (called Offset)
Gamma and Gain wheels offer more specific control over image correction than RGB curves alone.
Adjusting Green Hue of Auto White Balance. The green hue of the Auto white balance mode is caused by the camera assigning too many green pixels to anything that should be white, biasing the white point toward green. To correct this, in Resolve, we pushed the Gain away from green toward magenta bringing the white point back to true white as can be seen in Figure 3. The bottom half of the image is as recorded, while the top half of the image has the magenta correction applied.

Also note that the Lift (shadows) wheel also needed to be pushed slightly towards yellow to balance out the image.
Red hue of the One Push white balance. The red hue of One Push mode is caused by an entire shift in the color spectrum toward red influencing the whole image not just the white point. To improve the image we took a global approach and reduced the amount of red by pushing the Offset wheel in Resolve in the opposite direction, away from red into blue/aqua, adjusting the entire image (Figure 4). The top half of the image is as recorded while the bottom half has the offset correction applied.
Stage 3 – Application of different filter and white balance slate, acquisition and examination of footage
With the knowledge gained from post-production, we made some changes to the camera setup.
Green hue correction for Auto white balance mode. As seen above, to correct the green hue we were making changes toward magenta so it stands to reason that changing the red filter in the housing for a magenta filter would change the behaviour of the Auto white balance mode.
To test this theory we took two AX100’s on the same dive using Auto white balance mode, one Gates housing fitted with the red filter and the other Gates housing fitted with a magenta filter (Figure 5)
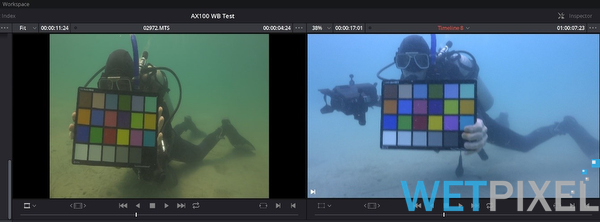
The magenta filter clearly made a significant difference to the overall white balance performance (Figure 5). The most notable difference being the change in water color from green to blue along with a more pleasing sand color.
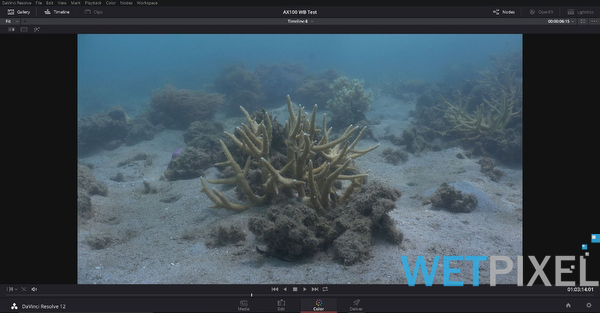
Our test and theory are successful: the magenta filter is now a beneficial color correction tool for the AX100 camera in these blue water conditions (Figure 6).
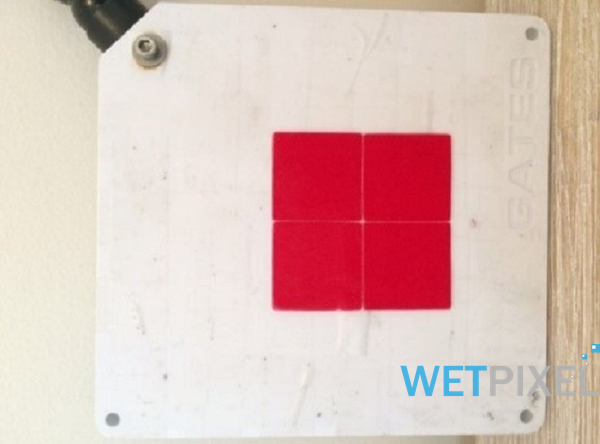
Red hue correction for One Push white balance mode. Next we moved on to looking for a correction for the red hue when using One Push white balance mode. We needed a way to balance the amount of red the AX100 was adding to bring the white balance back to a more acceptable level. We found this can be achieved by introducing red into the white balance equation (Figure 7). Whether you choose to use a slate, a white pair of fins, the sand or any other white/grey surface to perform your white balance, adding some red to the scene will help dramatically in correcting this issue. I found adding red stickers to my white balance slate the easiest (Figure 8).
I prefer to use the Gates white slate as it is attached to the housing using Loc-line fittings and can be easily moved in and out of position when needed.
Stage 4 - Apply additional changes in-camera (Tint feature)
Now that we know that adding magenta (by filter to the camera setup or moving the Gain in post-production) for Auto white balance and using red on our slate or adding blue/aqua in post-production for One Push, we are going to achieve an acceptable balanced image. However, Rule 1 states that we should always endeavour to acquire the best color possible in-camera.
The AX100 has an in-camera “tint” feature that can help fine-tune our results. It is similar to white balance, but provides fine control over the image color in a specific way. Let’s take a look.
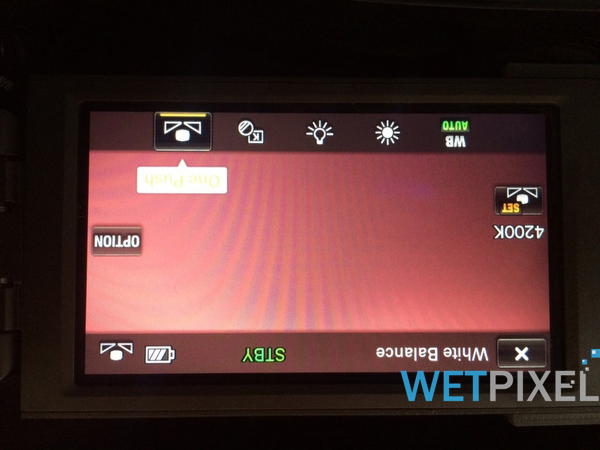
Access the Tint feature. By navigating to the “options” tab on the White Balance mode screen, you will access the “tint” function (Figure 9).
Apply tint. To assign the “tint” that you desire for the image, use the arrows along the bottom of the screen to navigate the yellow dot or simply push on the desired color on the screen, to choose your “tint” color (Figure 10).

In our case, we want to move away from the green color toward magenta. This has the same effect as using a magenta filter but the difference is this correction is applied after the camera has acquired the image. So we want to be careful and not push the tint too much and introduce other problems. Again, use the Tint feature, if desired, as a fine tune adjustment to your in-camera color correction.
A final word about Tint: adjust the Tint setting based on your evaluated results from specific conditions. For example, if you are on a dive trip to Papua New Guinea, take some test shots the first day, then adjust your Tint to fine tune the color correction for the remainder of your trip.
Warning! Remember to reset your Tint for night dives! With artificial lighting your in-camera colors will be thrown off significantly.
Recap
The Sony AX100 offers the underwater videographer, whether amateur or professional, a feature rich, compact and travel friendly setup for all of your underwater needs.
Understanding the behaviour of the AX100 camera – or any camera – underwater, and applying the color correction tools for your white balancing technique of choice will help you achieve rich, remarkable underwater images.
You should always aim to acquire the greatest color possible at the time of shooting. Your editing program can only manipulate information that has been recorded so get it as best as you can from the beginning. (As a side note, we found that Sony’s XAVC-s Codec stands up well to color grading. In short, this means more aggressive color grading can be applied to the footage with less consequence. Other codecs are not so. This will be further explored in another article.)
Color correction tools are often used together, here we have used a combination of filters, tint and colored white balancing slates. If you choose to white balance in Auto, make sure to use a magenta filter and fine tune with the tint in-camera. If you use One Push then white balance with a red and white slate and use the appropriate tint if desired.
In closing a final word of advice: there is no substitute for time spent getting to know your camera. Shoot, evaluate, adjust. Repeat. This time-tested method will be your best friend to achieve rich, colorful and popping underwater images.
The accompanying video illustrates differences made using the above methods.
Acknowledgements
Thank you to everyone that has contributed to help solve these issues.
In no particular order, the entire team at Gates Underwater Products, Mike Ball and Laurence Buckingham from Mike Ball Dive Expeditions, David Strain, Amelia McCarten, Klemens Gann and John Ellerbrock
To see more of the Peter Lightowler’s work, please see his website.